Scratch That Itch and Learn to Code: Getting Started
Hi! I’m Bob Shires, “Wizard of Ohms” and your friendly, helpful Mr. Fix-it for all things tech. I’ve worked in the Museum’s technology innovation department for three decades. I’m a professional “computer nerd” and award-winning robotics team coach. I’m combining those skills to help you start your journey into the world of computer programming.
Summer is the perfect time to start learning how to code. A great way to start is with Scratch, a free, web-based visual programming language developed by the Massachusetts Institute of Technology (MIT) Media Lab. Scratch guides users through the process of creating interactive stories, games and animations. It teaches some basic coding concepts, like thinking creatively and reasoning systematically.
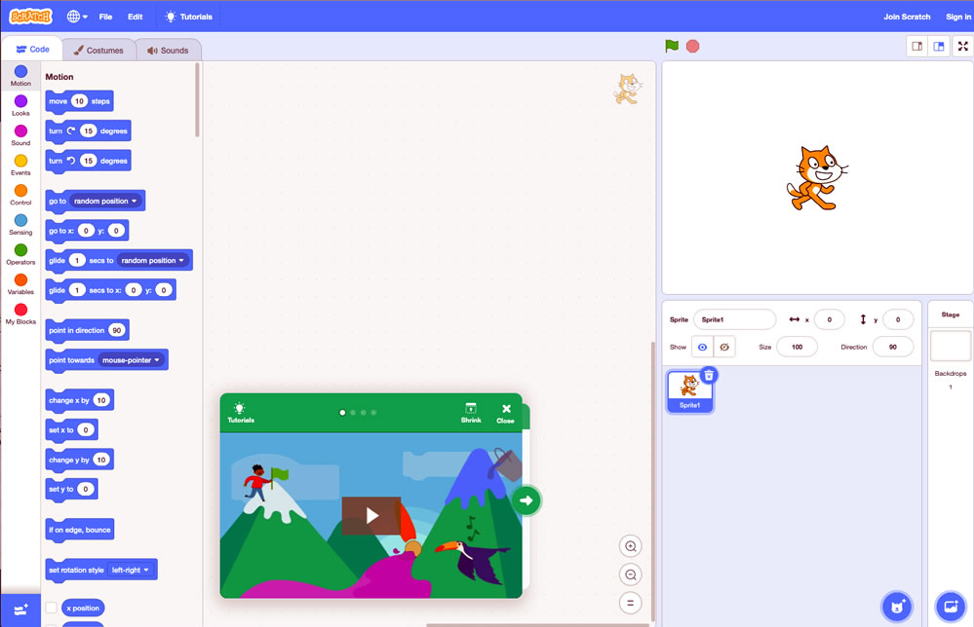
When you first visit the Scratch website you’ll be greeted with the screen pictured. You have the blocks palette in the left panel, the coding area in the center and the stage on the right. To build programs, you drag blocks off the palette, drop them onto the coding area, connect them together, then watch what you’ve created happen on the stage as our sprite performs the actions you programmed. In computer terms, a sprite is a two-dimensional object or character that helps you see what is executing the commands you’re programming. Our sprite’s an orange electric cat and I’m calling her Sparky!
The video is a simple introductory tutorial that you should watch! Repeat the steps shown to learn how it works and feel free to experiment. Go ahead, I’ll wait. I recommend creating an account so you can save your work. All that’s required is a working email address.
The user interface suggests Scratch is designed for children, but don’t underestimate it. While it appears cartoonish, Scratch allows users to build complex software while teaching coders of all ages the concepts used in programming. As she mentions in the video, you’ll find many more examples on the Tutorials page. Some simple and some are more advanced, but all are good!
In this series, I’ll demonstrate some simple computer science concepts with Scratch. We’ll learn:
- Looping, which is repeating a section of code a certain number of times.
- Writing a function -- called a My Block in Scratch -- which is a “packaged” sequence of instructions to perform a repetitive task.
- Lastly, we’ll generalize the My Block to make it more versatile.
In a classroom setting I usually start by having students verbally “program” me to walk around the room in the shape of a square. In other words, pretend I’m holding a long pencil straight up over my head, and give me commands that instruct me to walk so the imaginary pencil draws a perfect square on the ceiling. It often devolves into hilarity after they’ve (accidentally?) had me walk into a wall or furniture a few times, but eventually we arrive at a sequence of steps that work.
- Walk forward five steps
- Stop walking
- Turn (or pivot in place) to the right 90°
- Walk forward five steps
- Stop walking
- Turn (or pivot in place) to the right 90°
- Walk forward five steps
- Stop walking
- Turn (or pivot in place) to the right 90°
- Walk forward five steps
- Stop walking
- Turn (or pivot in place) to the right 90°
After these 12 steps I’ve “drawn” a square, I’m back to my starting position and I’m facing my starting direction.
Two important lessons from this activity are
- You have to “speak” to computers using very precise, unambiguous language.
- Computers are good at following instructions, but not at reading your mind.
With Scratch, such a “walk” looks like this. (Note: I changed the step count to 100 because Scratch counts “steps” in screen pixels, and five pixels is a tiny distance.)
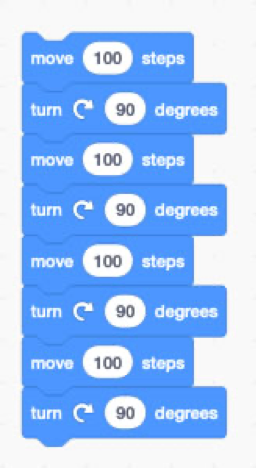
Try building this yourself in Scratch, then click on it anywhere to run. It looks like nothing happened, right? That’s because the steps repeat so fast it appears to be instantaneous. Plus, we haven’t given Sparky anything to draw with, so we’re left with a blank stage, and that’s boring.
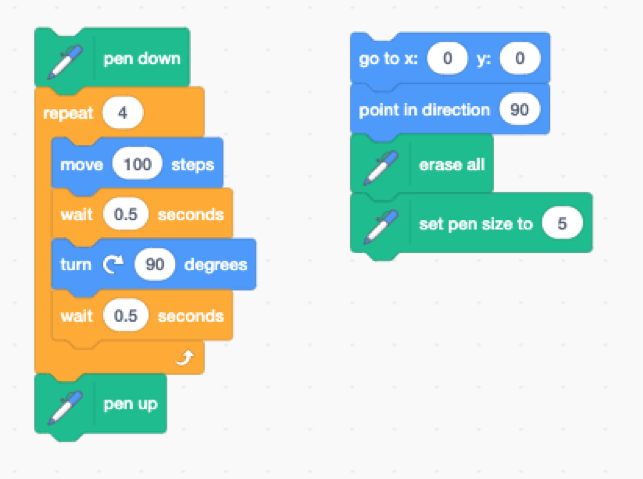
Let’s slow things down by adding a brief time delay (a “wait” block) of 0.5 seconds after each step and each turn. Let’s also give Sparky a “pen” so she traces a path as she moves. While we’re at it, create a new set of blocks to clear the stage and reset Sparky’s position. Modify your blocks to look like this. Hint: To save time, once you’ve placed a wait block and set its value, right-click on it and select “Duplicate” from the menu.

The “go to x: 0 y: 0” block moves Sparky to center stage, and the “point in direction: 90” block tells Sparky to face to the right (that’s 90°… 0° is straight up, 180° is straight down). The rest of the blocks should be self explanatory.
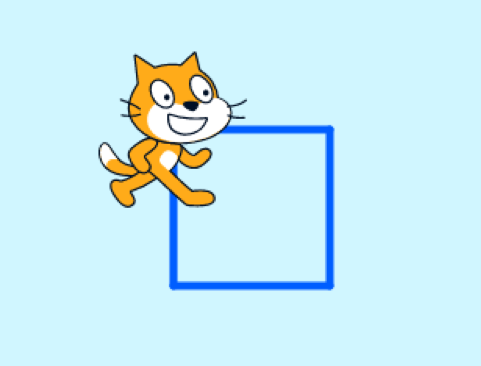
Click the two sets of blocks and watch what happens. Sparky is an artist! (Perhaps drawing a perfect square doesn’t strike you as masterful art, but I’ve seen less exciting works that get much acclaim!)
Experiment with the values and observe what changes. Not a fan of blue ink? Find a way to change the pen color and add that to the “reset” blocks.
Once you’ve finished, change your blocks back to match what’s pictured, because this is where the fun starts.
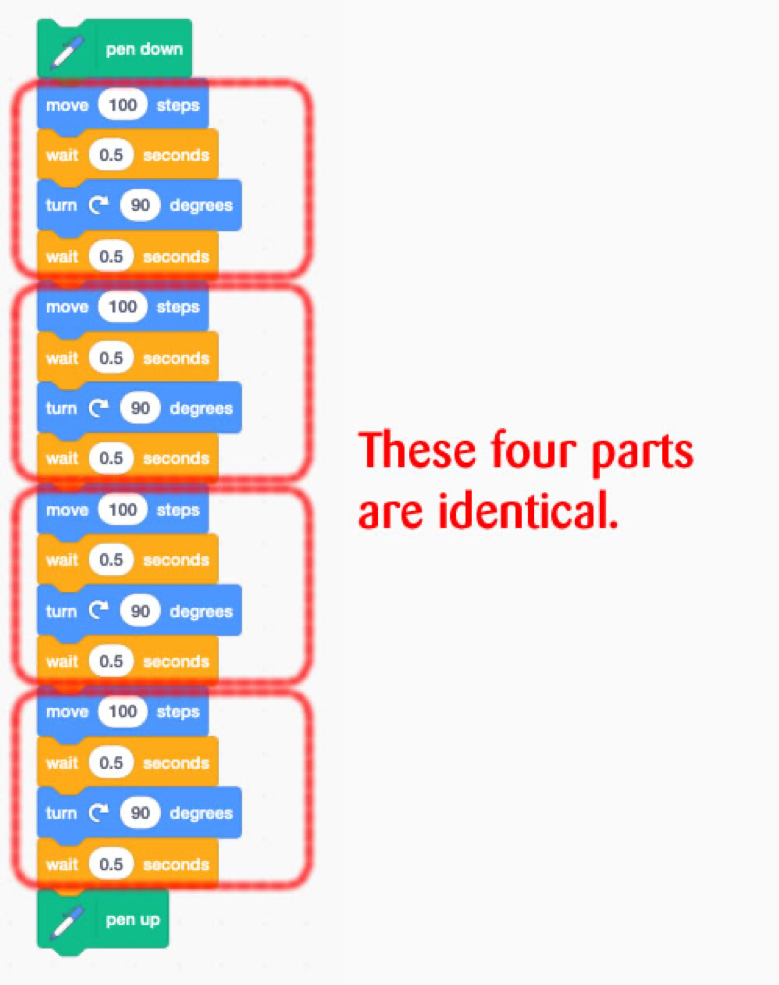
You’ve probably noticed by now that our method for drawing a square involves lots of repeated steps. The picture above shows the blocks for drawing each of the four sides are identical. This is inefficient; assembling all those blocks was cumbersome, tedious and possibly error-prone. If you decide you want a different-size square, you have to edit values in four different places, another opportunity for introducing errors.
When writing your own programs, get in the habit of looking for patterns like this. If you spot identical parts of code in different parts of your program, it should set off an alarm in your head. Since I’m a coach, just imagine me blowing a loud foul whistle!
We’ll fix it by plucking out a set of blocks that repeat, and enclose them in a block that tells Scratch to repeatedly execute those blocks a certain number of times. In computer science this is called looping.
Click on the Control palette (left side, orange) and drag a repeat block onto the coding area. See the picture for details.

Next, drag the four blocks that draw one side of our square into the repeat block, change the repeat count to 4 and delete all the blocks we don’t need (right-click and select delete block). Your coding area should now look like this.
Ahhh, that’s better! Click the two sets of blocks and watch what happens. Everything inside the repeat block is performed the specified number of times. Much easier to write and modify. For example, say we want to make a larger square with 150 “step” sides. We only have to change one number. Go ahead, try it.
Ok, hot shot. Coach will give you the game ball if you can tell Sparky to say “meow” at the end of her walk. Here’s a hint: look in the purple Sound blocks palette.
Are you tired of the square already? What if we want to draw a triangle or a pentagon? We could modify this program to draw those shapes, but there’s a better - reusable - way to do it. And, that’s exactly what we’ll cover in part two of this series! In the meantime, keep looping and functioning until you get comfortable with that process.