Learn to Code, Part 3: Game On!
Welcome back! Bob Shires here, your official coding coach, and I’ll remind you that you must learn to walk before you can learn to run. What do I mean? Well, sport, I’m saying that it’s essential to first do parts 1 and 2 in this learn-to-code blog series, so go do them now!
We’re going to give Sparky a little time off while I show you how to create a simple “pong” game in Scratch. In the process, we’ll learn about events, conditional execution, multiple processes and inter-process communication. Sounds like fun, right? Let’s go!
Log back into Scratch with the account you created (reminder: I covered that in the first blog) and from the File menu, select New.
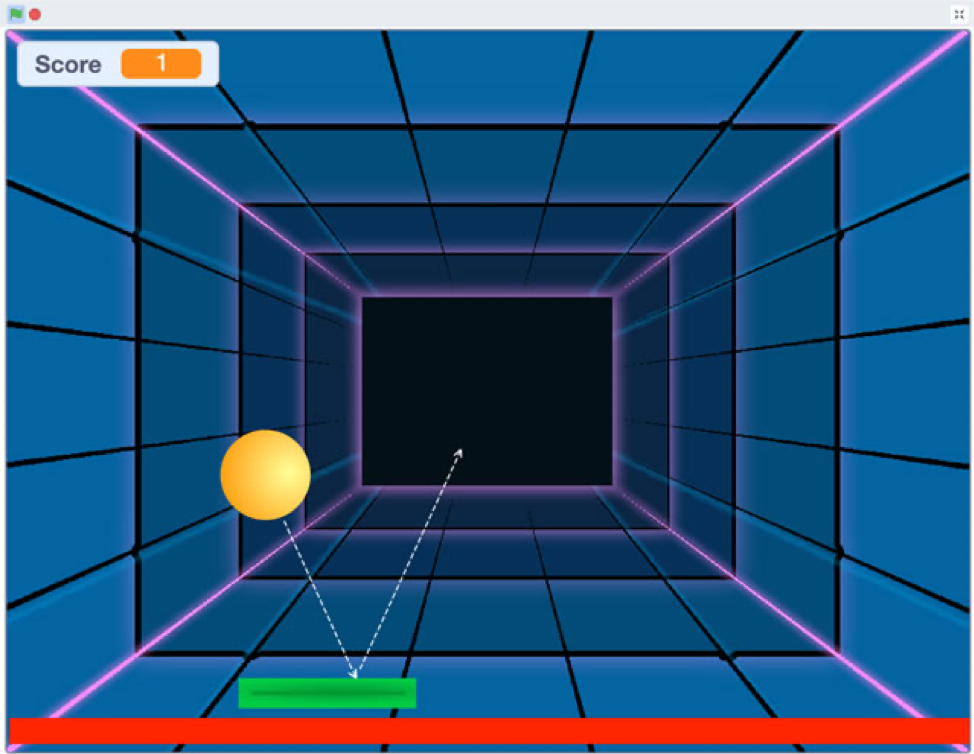
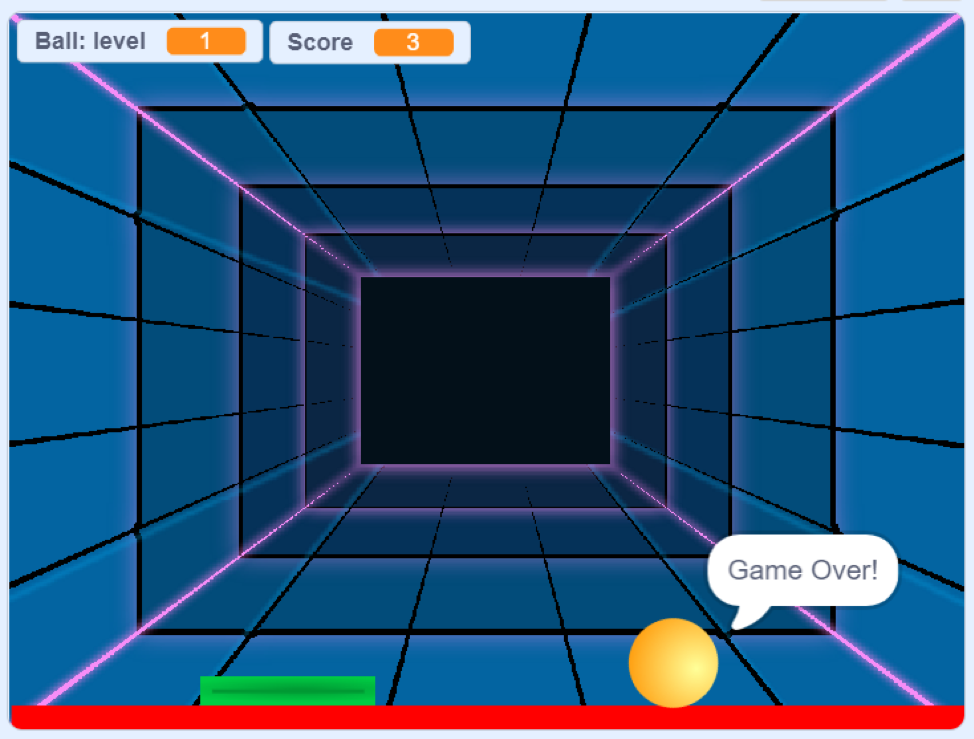
Here’s a screenshot of the game we’re going to create. The object of the game is to keep the bouncing ball from touching the “red zone” by moving the green paddle left and right with the mouse while displaying the score on the stage. Let’s get started!
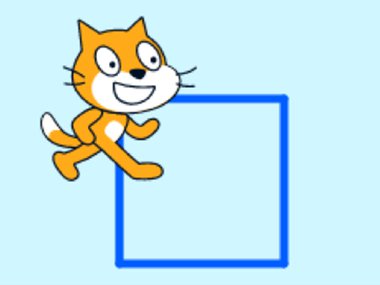
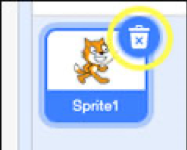
Step 1: delete Sparky. Au revoir, Sparky! We don’t need her in this game so click the little trash can near her head. Don’t worry, she'll be joining us again soon!
Step 2: pick a new backdrop. In the lower right corner, click the “Choose a Backdrop” icon. I’m using a backdrop called “Neon Tunnel” but there are many choices and you can use any you like. Suit yourself! You’ll see the stage change to reflect your choice.
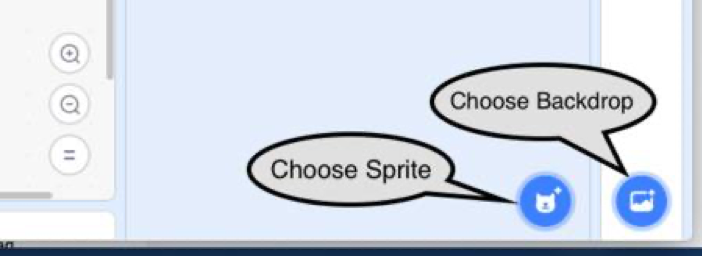
Step 3: place the ball sprite. Click the “Choose a Sprite” icon in the lower right corner, and locate the “Ball” sprite. As you hover your mouse pointer over it, you’ll see it changing colors. These are the Ball sprite’s different “Costumes” (we’ll explore that more later). Click the Ball sprite to place it on the workspace. It should appear like so:

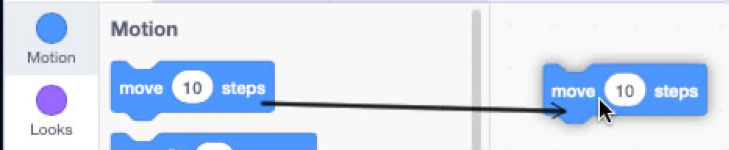
Step 4: get the Ball moving. Drag a “move” block onto the coding area. Click it a few times and watch what happens. The Ball moves to the right a little (10 pixels) for each click, right? If it gets too near the edge, drag it back to the center.
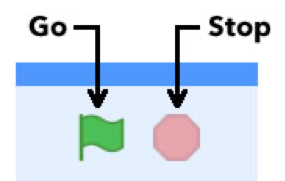
We want the ball to move by itself. From the Control blocks palette, drag a “forever” loop block to the coding area, then drag the “move” block you placed earlier inside it. Click the blocks to set the ball in motion. Note that the currently running set of blocks “glow” with a yellow border. To stop a running program, click the red “Stop” icon above the stage. (It’s next to the green flag, which is the “Go” button. We’re going to find out what that does, too, very soon!)
But now the Ball is stuck on the edge of the stage! We want it to bounce.
From the “Motion” palette, drag an “if on edge, bounce” block and drop it below the “move” block inside the “forever” loop. Click the blocks to start the ball moving again.
Now the ball is bouncing left and right across the stage, but we want it to bounce at an angle. Place a “point in direction 90” block on top of the “forever” loop block, and change the value to an angle between 20 and 160. I’m doing 45.
While you’re there, grab a “When Green Flag Clicked” block from the Events palette and drop it top of the stack. Your blocks should now look like this:
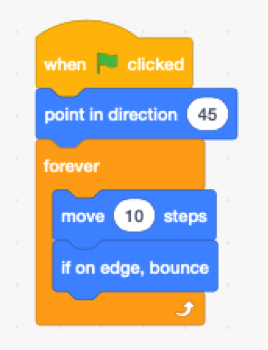
Remember the green flag icon above the stage I mentioned earlier? Can you guess what it does? Click on it, if you haven’t already. The ball should be moving around the stage, bouncing off the edges.
The “When Green Flag Clicked” block, commonly called the “Start Block,” is a “Hat Block” that listens for a Start event. When the green flag icon above the stage (the Go button) is clicked, it sends a start event in your project. Scripts (a stack of blocks, like those pictured above) that wear this block “listen” for the start event and will activate when they hear it. Multiple scripts can each wear the block and all activate at the same time, running in their own separate processes.
Step 5: place the Paddle sprite. Now let’s place another sprite for the player to use to hit the ball - the paddle. Click the “Choose a Sprite” icon and select the green ”Paddle” sprite. It will appear on the stage and in the Sprites area next to the ball. It should be “selected,” as shown below. Click on it if it’s not.

On the stage, drag the paddle down toward the bottom of the screen. Leave a little space below it to make room for the “red zone” that we’ll place later. Don’t worry about being too particular -- later we’ll write code to place it exactly where we want it when the game starts.
Notice that with the Paddle sprite selected, your coding area is now blank! Each sprite in your program gets its own coding area -- its own set of blocks -- and runs in its own separate process.
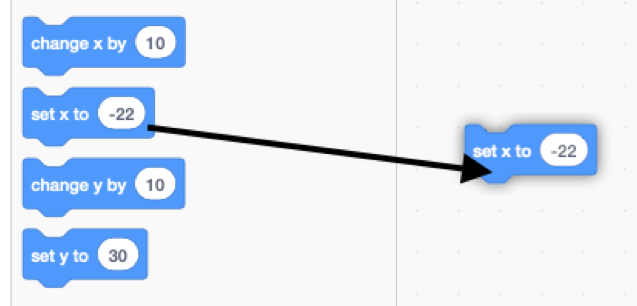
Step 6: get the paddle moving. We want the player to move the paddle from side to side with the mouse. Make sure the paddle is still selected, and from the blue Motion blocks palette drag a “set x to __” block into the coding area, as shown below (don’t worry about the numbers shown in the blocks, they don’t matter now).
Notice the other blocks set or change ‘x’ and ‘y’ values. They refer to the horizontal and vertical axes of the stage, respectively. The ‘x’ axis is horizontal (side to side) and the ‘y’ axis is vertical (up and down). We’ll explore that more later when we precisely position sprites on the stage to start the game.
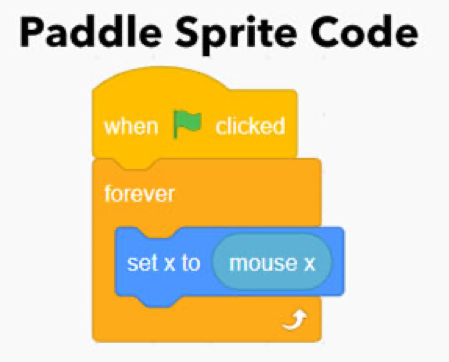
We want to control the paddle’s horizontal position so we select a “set x to __” block for the paddle.
To tell the paddle what ‘x’ position to go to, we need to know where the mouse is. From the Sensing blocks palette, drag a “mouse x” block and drop it in the “set x to __” block’s placeholder, as shown here.

We want the position to be constantly updated, so just like we did with the Ball, wrap it in a “forever” loop block, and place a “When Green Flag Clicked” hat block on top of the stack. Your Paddle coding area should look like this:
Click the green flag icon above the stage to set everything in motion. The ball should be bouncing around the stage, and you should be able to move the paddle side-to-side with the mouse.
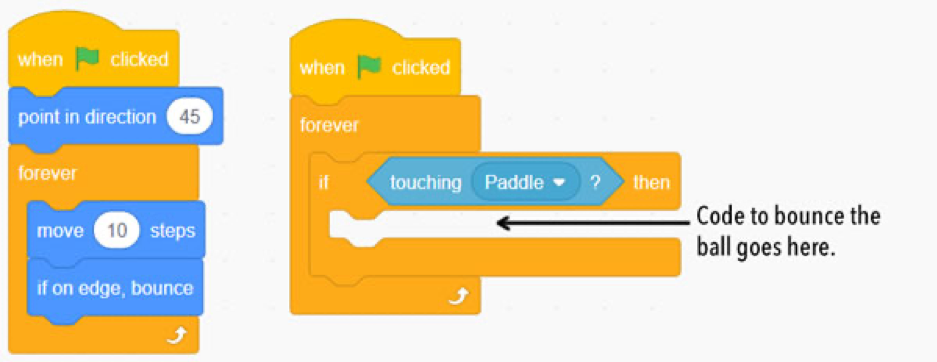
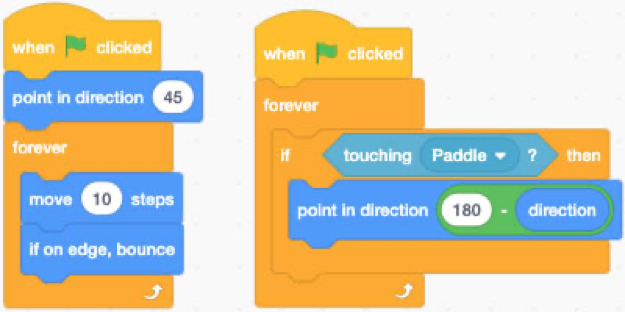
Step 7: add code to bounce the ball off the paddle. The logic we want to implement here is “if the ball is touching the paddle, then bounce.”
It was easy to make the ball bounce off the edges of the stage because Scratch provides the “if on edge, bounce” block. No such block exists for sprites contacting other sprites, so we have to make our own.
Don’t worry, champ. You can do it! Just follow these steps:
- Select the Ball sprite, then drop a “forever” loop block next to the stack of blocks we placed earlier.
- Place an “if < > then” block inside the forever loop block.
- From the “Sensing” palette, drop a “touching (mouse-pointer ▼)?” block into the “<>” placeholder.
- Click the ▼ and select Paddle.
- Place a “when green flag clicked” hat block on top.
Your coding area for the Ball should look like this.
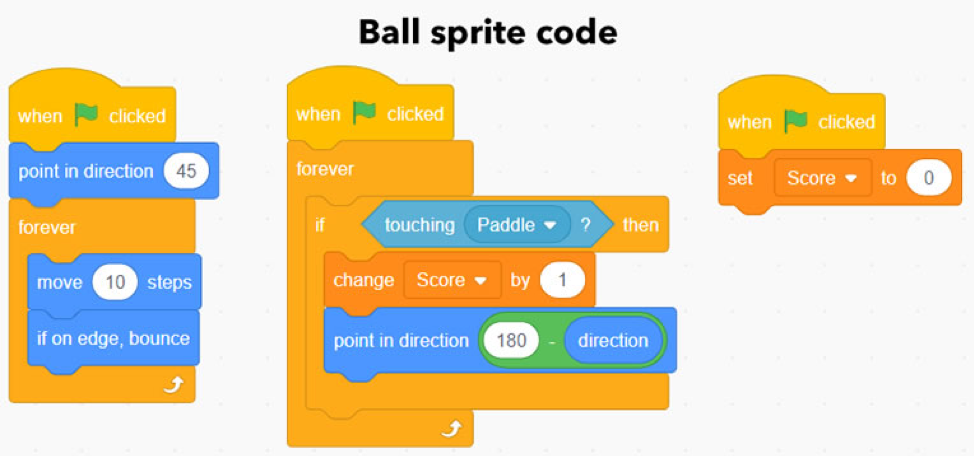
Look at the picture below. The ball approaches (red line) a horizontal surface at the incident angle (measured clockwise from vertical, or 0°) and bounces, or rebounds (green line) at the reflected angle. We can get the Ball sprite’s current direction -- the incident angle -- from the “direction” block on the Motion palette.
Let’s say it’s moving at the angle shown, 140°. For it to bounce realistically, it should reflect at an angle of 40°. How do we find that? Subtract the direction the ball is moving from 180°. For example, 180° - 140° = 40°.
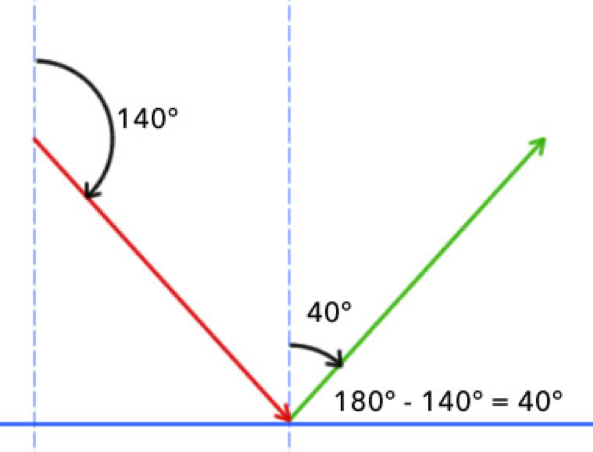
Note for your future game building: That works for sprites bouncing off horizontal surfaces. For vertical surfaces, multiply the sprite’s direction times -1 (see the figure below). To explore more about how sprites interact in Scratch, here are some other projects.
Click the “See Inside” buttons on the project pages to explore each project’s code.

Build the set of blocks pictured above “For bouncing off horizontal surfaces” and place them inside the “if ” block. Your coding area for the ball should look like this.
Hit the “Go” button (the green flag icon) to set everything in motion. The ball should be moving and bouncing, you should be able to move the paddle with the mouse and the ball should bounce off the paddle.
If you’re very careful (and very lucky) you might be able to trap the ball under the paddle and have it bounce a few times in the small gap between the paddle and the bottom edge of the stage. That’s cool (and a little hilarious) but it’s definitely not how we want the game to work. Hit the Stop button.
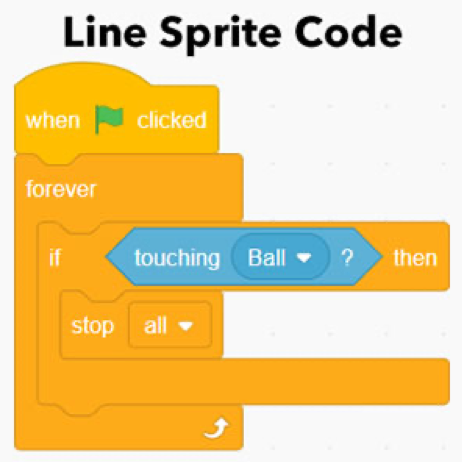
Step 8: Place the “Red Zone” sprite. Click the “Choose a Sprite” button and find the sprite called “Line” (here’s a pro tip: use the Search feature). As before, once you’ve found it, click on it to add it to your project. You’ll see it appear next to the “Ball” and “Paddle” sprites, and in the center of the stage.
On the stage, drag it so the bottom edge of the red Line is just touching the stage’s bottom edge, and it’s centered side to side. You might want to fine tune the Paddle’s position, too. Move it vertically so there’s a tiny bit of backdrop visible between it and the Line.
Select the Line sprite and let’s code it up!
The logic we want to implement is “if the Ball touches the Line, then it’s game over.” This will be similar to the code we wrote for the Ball: we want to detect when one sprite contacts another, then perform some action.
Set up the same blocks here that you did for detecting when the Ball touches the Paddle (the right-hand set of blocks in the above picture). Leave the inside of the “if ” empty for now.
Recall that when the Go button is clicked, scripts (block stacks) that wear a Start block activate and each run in their own process. When the Ball touches the Line, it’s Game over man! and we want to immediately stop all scripts in our project. Scratch provides a block to do just that! From the Control palette, drag a “Stop (all)” block into the body of the “if ” block. Your coding area for the Line sprite should look like this.
Step 9: it’s time to keep score. Each time you hit the Ball with the Paddle you earn a point. Select the Ball sprite and create a new variable called “Score.” Set its value to 0 (zero) under a new Start block, and change the Score by one each time it hits the Paddle. Here’s how I coded the Ball sprite in my game.
That’s it! Your “pong” game is ready to play!
If you’ve played several games and are ready for an additional challenge, here are a few things you can do to improve the game and make it more interesting. I’m not going to explain how to do them (I did say it was a challenge) but since you’ve been coding for a bit now, I bet you can score big on your own!
- Try controlling the Paddle with the keyboard (left and right arrow keys, or the A and D keys) rather than the mouse. Maybe you’ll be like me and prefer it that way!
- Reset the Ball and Paddle positions to the same place each time the game starts.
- Try launching the ball in a random direction, instead of at 45° each time, when play begins.
- Add a time delay and countdown for when the game starts, so you can get ready.
- Add sound effects. (That can get as silly as you like!)
- Add a way to “level-up” as your skills improve, change the difficulty, backdrop and Ball color each time the level changes.
The Museum is hard at work helping you to discover your world despite dramatically reduced financial resources. If you'd like to help us continue this work, click here to learn how.