Learn to Code, Part Two: My Blocks and Functions
You came back! Maybe you felt bad that all Sparky could do was draw a square. Don’t worry … Bob Shires here, back to coach you on your journey of learning to code. We’ll have Sparky scoring some new tricks right away!
**Whistle blows** Time out! If you’re just jumping in, make sure you start this journey with the introductory blog that explains Scratch and some basic coding options. After you master that part of the process, you’re ready for this piece: my blocks and functions. Let’s jump right in!
As we saw in part one, when programming it’s very common to encounter tasks and calculations that you need to perform repeatedly. Rather than write the same code over and over, a better solution is to build a My Block. As the name suggests, a My Block is a block that you design yourself to perform any task that you might need. They allow you to reuse code that performs a certain task over and over. Think of it as packaging a chunk of code. When you define a My Block, you specify its name, any input values it might need and the sequence of steps it will perform. Later, you “call” the My Block by its name.
In computer science, this is known as writing a function.
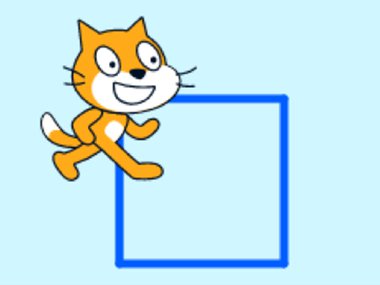
We are going to define a My Block. It will draw a line of a specified length, then turn a specified number of degrees, passing the desired values to the My Block as inputs. We’ll place the My Block inside a repeat block in our main program and perform it as many times as required to draw the shape we want. Don’t worry … that may sound complicated, but I’ll walk you through it step by step.
Log back into Scratch with the account you created (reminder: I covered that in the first blog). Click on the red “My Blocks” palette, then click the “Make a Block” button at the top. You’ll be presented with this:
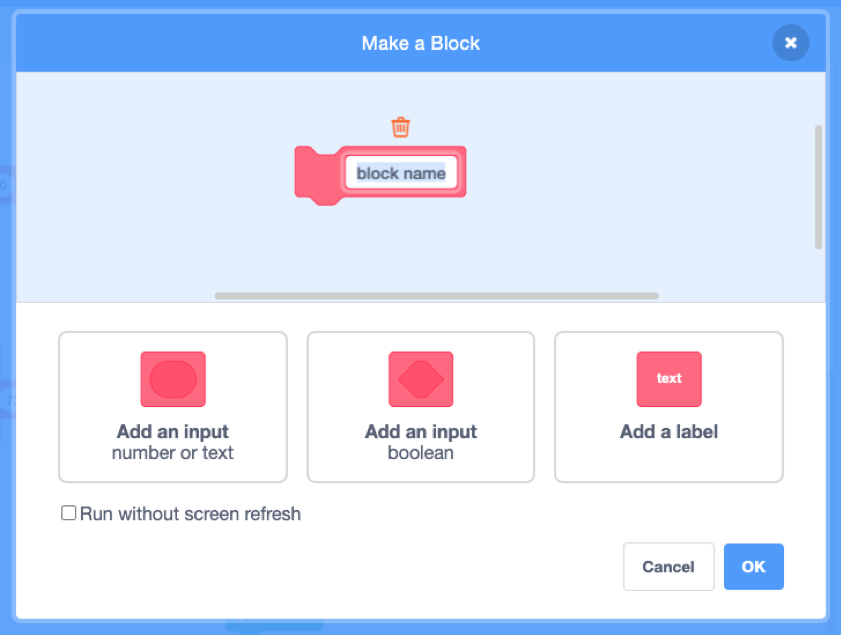
For the block name, type “drawLine” and press enter/return on your keyboard. By convention, function and My Block names start with a small letter followed by “camelcase” words with no spaces or punctuation. Camelcase, or sometimes called camel caps, is a writing style that capitalizes the starting letter of every word except the first. For example, a My Block that draws a line then says “meow” might be called “drawLineAndSayMeow.”
Our drawLine block needs to know two things: How long the line should be and what angle to turn at the end. Use the “Add an input” feature to “pass” these values to our drawLine block. Click the “Add an input” button twice. You should see this.
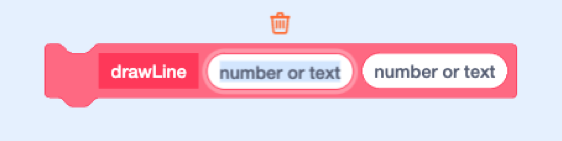
Call the first value lineLength, and the second value turnAngle (remember, first letter small then camelcase with no spaces). Click the OK button. Nice work, sport! You just created your first My Block! You should immediately see the block appear in your coding area, ready for definition, and a new block appear on the My Blocks palette ready for use.
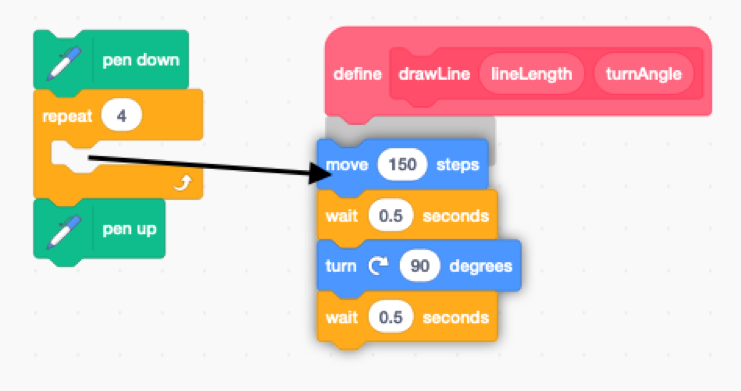
We’ll use the big define block in the coding area to build our drawLine block. Prepare by arranging the blocks in your coding area to look like this:
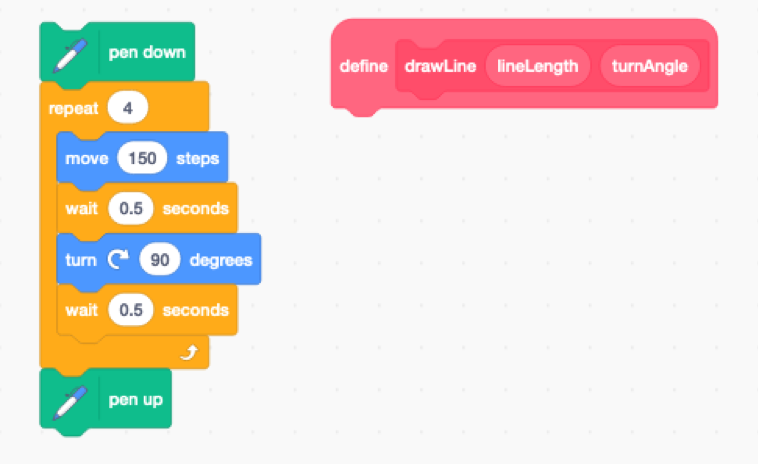
Drag the four blocks that draw one side of the square out of the repeat block and connect them to the drawLine definition, as pictured.
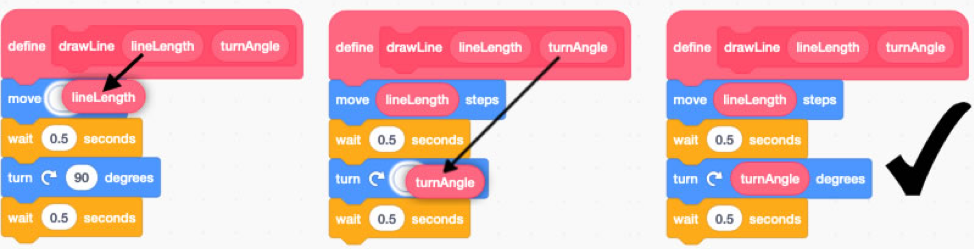
We have to tell the move and turn blocks to use the lineLength and turnAngle input values. Drag the lineLength and turnAngle input blocks to their correct locations in the drawLine definition block, replacing the numbers you typed in earlier. Your drawLine block is now ready to use!
Drag a drawLine block from the My Blocks palette and drop it inside your empty repeat block. Fill in the values 100 and 90 as shown below, click the blocks and watch Sparky draw a square.
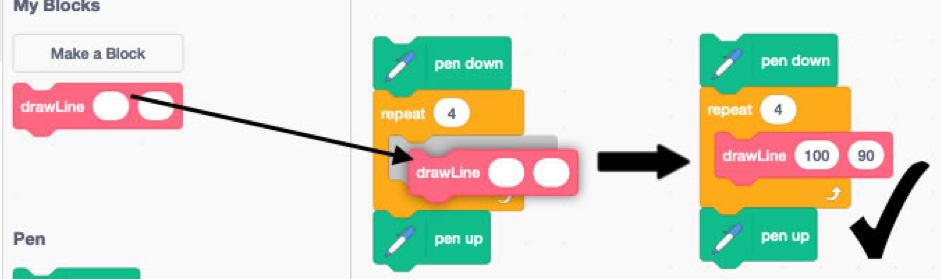
The value 100 is passed to the drawLine block as the lineLength input, and 90 is passed to it as the turnAngle input, so you get the same size square we were drawing earlier. To change the size of the square, enter a different value for lineLength. Go ahead and try it … it’s fun to test it out by watching Sparky do what you tell her!
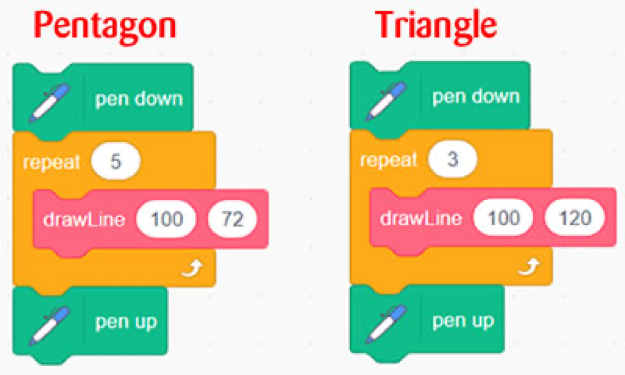
The advantage of this method is we can use it to draw other shapes, not just squares. Suppose we want to draw a pentagon, a polygon shape with five equal sides. Changing the repeat count to ‘5’ is easy enough, but we also have to change the turnAngle otherwise Sparky will simply draw a square again, tracing over the first side a second time.
For Sparky to return to her starting position after drawing a shape, the angles she turns must add up to 360 degrees. For a pentagon, we specify a turnAngle of 360 ÷ 5 = 72, and for a triangle 360 ÷ 3 = 120. Go ahead, champ, and take another time out to try it!
Knowing that computers are good at math, you might be wondering why we had to do that turnAngle calculation ourselves. With a little more work, we can have Scratch do the math for us, potentially saving us lots of work in the future. Let’s create a block that will draw almost any shape we want, given the number of sides and length of the line segments, calculating the turnAngle inside the block.
Create a new My Block called “drawShape” that takes two inputs: the desired number of sides, called numberSides, and the desired line length lineLength. You are a Scratch expert now (a Scratcher, or maybe Scratchnician?!) so I’m leaving the creation of this My Block up to you!
One of the most powerful features of a programming language like Scratch is the ability to manipulate variables. A variable is a named location in memory that stores a value. Values may be numbers, text, images, sounds and other types of data.
Once you’ve created a variable and assigned it a value, you can retrieve it by “calling” its name. You could change it to something else by assigning it a new value.
We are going to create a variable called turnAngle and use it to store the calculated turn angle. Here’s an example: turnAngle= 360 / numberSides. I’m using the ‘/’ character to indicate division since that’s what Scratch uses. Use the turnAngle as an input to the drawLine block we built earlier. drawLine will do the work of repeatedly drawing the individual line segments in the drawShape block we’re creating now.
This is what we’re going to make. See if you can build it yourself! If you get stuck, follow the pointers below.
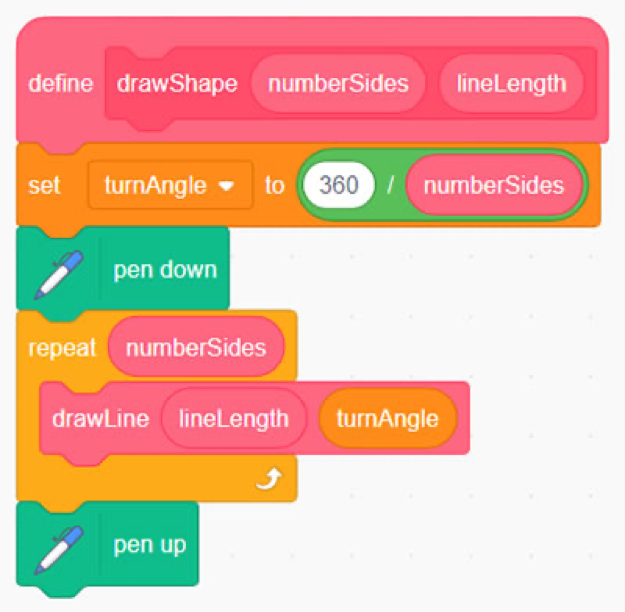
Notice how we’re using the turnAngle variable. First, in the “set” block, we calculate 360÷numberSides, then store it in turnAngle. Further down in the repeat loop, our turnAngle variable becomes one of the inputs to drawLine.
Also notice how we’re using the drawLine block we created earlier inside our drawShape block, to do the work of drawing the line segments in our shape. This is how good computer programming works: You start by building small reusable “tools” that each do one thing well, then combine them to build larger, more complex tools.
Here are some hints for building the drawShape My Block:
Select the Variables palette and click the “Make a variable” button. Call it turnAngle and click OK.
Drag a set block from the Variables palette and connect it to the drawShape block you just made. If it isn’t already, change the selector dropdown to turnAngle.
On the Operators palette, drag a “divide” block (it looks like a green figure eight turned on its side) out and drop it into the “hole” in your set turnAngle block.
Don’t forget that turnAngle is 360 divided by the number of sides we want. Type 360 into the left side of the ‘/’ operator, then drag numberSides into the right side.
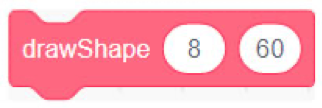
Try it out! For example, to draw an octagon (8-sided figure, like a stop sign) you only need one block. (I shortened the lineLength to keep it inside the drawing area, called the stage.)
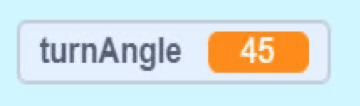
Notice also that something new has appeared on the stage: a watcher or monitor to show us the values of the variables we’re using. In this case there’s only one, showing us the current value of turnAngle. Right-click on it and explore how you can change the display.
Some Things to Try
Tip: If Sparky is moving too slowly for you, change the wait block times in drawLine to 0.1 seconds to speed things up. What do you think would happen if you change the speed to 0.01? (hint: Sparky is trying to set a new world record!)
Another Tip: As your shapes get larger and more complex they might overflow the stage. In your “reset” blocks, change the y: value to 100 to expand your workspace.
Experiment with drawing a circle. How many “sides” does it require to actually look like a circle?
Look at the My Block below. Can you figure out what it does, and how it works? If you get it right, there’s an (ahem, imaginary) trophy in it for you!
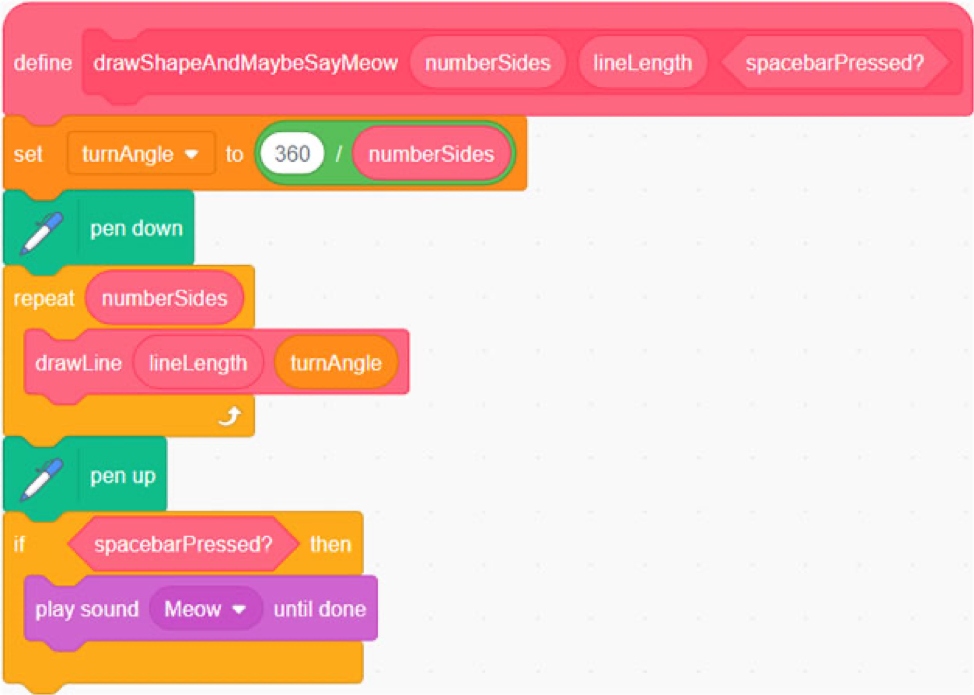
Here’s a sample of how to use it. Build it yourself and try it! Click it, clear the stage, then hold down the “space” key on your keyboard and click it again. Make sure you have the sound on!

Ok, that game is over. Final score: you’re doing great! You are well on your way to learning to code. Keep working on what we covered in this post. Then, when you’re ready, check back to learn more about computer programming in Scratch in part three of the series, which we will be posting soon.
The Museum is hard at work helping you to discover your world despite dramatically reduced financial resources. If you'd like to help us continue this work, click here to learn how.